
Amazon Vendor Central Guide 2025
Everything Consumer Brands Need to Know About Selling with Amazon Vendor Central
- Franklin Morris
Table of Contents
The Amazon Vendor Central program gives consumer brands brands the ability to sell directly to Amazon as a wholesaler, as opposed to a third-party. Most medium and larger brands choose this approach, but it is not without complexity and a few potential pitfalls.
We’ve compiled this guide to help you get the most out of your Vendor Central account in 2025. This guide will walk through everything you need to know about Amazon Vendor Central so you can answer questions like:
- What is Vendor Central, and how to get an invite?
- What are the main differences between Seller Central and Vendor Central?
- What are the benefits and disadvantages of becoming an Amazon vendor?
- How to use Vendor Central reports and analytics capabilities effectively
- How to succeed on the Amazon Vendor Central platform
What is Amazon Vendor Central?
Amazon Vendor Central is a program that sets up large manufacturers and brands as a wholesale seller directly with Amazon. It’s an invite-only program designed to let Amazon own and sell your products on your behalf. This cuts down on a lot of the day-to-day tasks of managing an e-commerce storefront.
In essence, Amazon itself becomes your only customer for selling via this popular e-commerce marketplace.
The benefits of using Amazon Vendor Central include:
- Easier admin with only one customer to manage
- Simplified operations (fulfillment, shipping, customer service, and returns)
- Larger wholesale orders that are easier to plan for and execute
- Global reach through an established e-commerce network
- Access to Amazon data
- Better consumer trust and validation
- Streamlined accounting and payment
What is Amazon Seller Central?
Amazon Seller Central is for brands that want to sell third-party to consumers via Amazon. They can set up an Amazon Seller Central account and retain direct control over their product listings, pricing, and inventory management. Amazon acts as the marketplace where goods are displayed. Think of how a physical farmer’s market or mall in the real world brings multiple brands together. Most smaller or mid-size brands decide to sell on Amazon using a Seller Central account.
How is Amazon Vendor Central different from Seller Central?
Brands that are set up with Amazon Seller Central have established a relationship with Amazon where they sell third-party to customers. Brands that are part of the Amazon Vendor Central program sell directly to Amazon.
Almost anyone can set up an Amazon Seller Central account, where-as you need to be invited to become a vendor on Amazon Vendor Central.
Some brands prefer to be set up as Sellers because it lets them retain control over their products. They can handle the fulfillment of all their orders, and they retain the ability to engage directly with customers.
Other brands prefer to be set up as Vendors because it drastically reduces the amount of labor involved in managing sales through Amazon.

Let's compare: Seller Central Vs. Vendor Central
| Amazon Seller Central | Amazon Vendor Central |
|---|---|
| Sell third-party to consumers | Sell first-party to Amazon |
| Open application process | Invite-only |
| Any size company | High-demand products / large companies only |
| Ability to control retail price | Limited control over pricing |
| Lots of admin work to manage storefront | Reduced labor managing account |
| Flexible logistics | Fixed logistics |
| Limited advertising options | Better advertising options |
| Individual sales to consumers | Wholesale / larger orders to Amazon |
| Harder planning for demand | Easier planning for demand |
How do I get an invite to Amazon Vendor Central?
Joining Amazon Vendor Central isn’t as simple as joining Amazon Seller Central. This is because not every brand gets an invite, and there is no application process. You need to be discovered by Amazon’s global team of vendor recruiters.
Once you get their attention, they will evaluate your brand before deciding whether to extend an invite to your company.
Amazon’s vendor recruiters look for things like:
- Existing strong sales through Amazon Seller Central
- Strong market performance and high-demand products
- Innovative new products featured at trade shows
- Operational capacity to handle large wholesale orders
Make sure to check your company email for an invitation to join Amazon Vendor Central. From there, you can start the official process and commit to their terms of business. Then, you can start selling to Amazon directly!
Setup and access to Amazon Vendor Central
So you’ve been invited to Amazon Vendor Central—what’s next? After receiving an invitation to join Amazon Vendor Central, follow these account setup steps to get started:
- Accept the Invitation: Review and agree to Amazon’s terms to become an official vendor on the platform.
- Register Your Account: Use the provided registration key or code to create your Vendor Central account.
- Configure Your EDI Integration: Set up your Electronic Data Interchange (EDI) for purchase orders, invoices, and shipment details. You’ll need to select an EDI service provider, map your product data to Amazon’s format, and complete Amazon’s testing and certification processes.
- Provide Product Information: After your EDI connection is established, you can upload detailed product data. This should include images, specifications, and suggested pricing.
- Manage Purchase Orders: Monitor and fulfill purchase orders from Amazon through the Vendor Central portal.
- Set Up Marketing and Advertising: Take advantage of Amazon’s vendor-only marketing services to get your products in front of more customers and drive sales.
Vendor Central features and tools
Once you get your Vendor Central login established, it’s time to check out the features and tools available in your account. The homepage is the jumping-off point where you can access tabs to complete important actions regarding:
- Orders
- Items
- Merchandising
- Reports
- Payments
- EDI
- Settings
How do I manage orders in Vendor Central
Clicking on the Orders tab in Vendor Central will take you to a dashboard where you will find all pertinent information on managing POs. Here you will be able to review your purchase order details, see direct fulfillment orders, shipments, as well as any returns in process. This dashboard will help you maintain an understanding of what is flowing in and out of the Amazon distribution centers—by product, quantity, and location.
The PO management process in Vendor Central goes like this:
- Receive purchase orders from Amazon
- View, manage, and edit your orders in a single dashboard
- Submit up-to-date shipment information to maintain communication
How do I manage product catalog updates in Vendor Central?
It’s easy to make edits and updates to your items in Vendor Central. You can even remove items from your product catalog within the portal. There are two main ways to go about this, the first involves manually making edits in the Item section. The other involves downloading the appropriate template and making the necessary edits before reuploading to Vendor Central.
If you only have a few edits or items to remove, we suggest manually making edits via the ‘Manage Inventory’ dropdown inside the ‘Items’ screen.
Find the product you want to change using the search function or simply scroll to it. If you want to remove a product listing, simply select the grey ‘Edit’ button and choose ‘Delete Product and Listing.’ If you have a few items to delete, try using the multi-select feature on the top left side of the table. It’s important to note that the ASIN will continue to exist. Deleting a product will simply remove it from your catalog, not from Amazon’s records.
Updating an item in vendor central is also managed through the Items section. Select ‘Edit Products’ and navigate to the product that needs to be changed. Choose the ‘Edit Product Details’ on the item and make your updates. Product details that can be changed include:
- Product title and description
- Features and benefits
- Images
- Promotional pricing or sales campaigns
- Product specifications (sizing, shipping weights, etc)
- Keywords and search terms
- Linked products and ASIN parent/child relationships
- Product category and classification
- Compliance and legal information
Use a template to make edits or deletions if you have a lot of updates to make at once. From the dropdown menu within the ‘Items’ tab, click on ‘Manage Catalog.’ Here you will find all the templates you need to make edits or delete items in bulk. Choose the appropriate template and fill it out. Go back to the ‘Manage Catalog’ screen in Vendor Central and upload your completed template. Your requested changes will then begin to process. Depending on the quantity of changes and the data type, your submission can take anywhere from a couple of minutes to a few days. Most smaller template uploads take approximately 5 minutes to process.
Where can I update product costs in Vendor Central?
You do not control the final cost to the consumer of your products being sold through Amazon Vendor Central. Amazon sets the price consumers see when shopping for your products. However, Amazon does adhere to Minimum Advertised Price (MAP) requests, which you can set within the Items dashboard within Amazon Vendor Central. This will help you maintain your pricing strategy across retailers.
Requesting wholesale price changes for the products you sell to Amazon is much more straightforward. Simply click on the ‘Edit Item Costs’ dropdown option in the ‘Items’ dashboard. Download all of your current costs using an Excel template, then make your cost modifications. Save your edited spreadsheet as an Excel 2003 XML Spreadsheet (.xml) and return to the ‘Edit Item Costs’ page. Here you can choose ‘Upload Costs’ and select your saved file.
Amazon then reviews your proposed pricing changes and can approve or reject updates. Make sure to monitor your price change status in this screen, as it may take between 30 days to several months for Amazon to approve your new pricing.
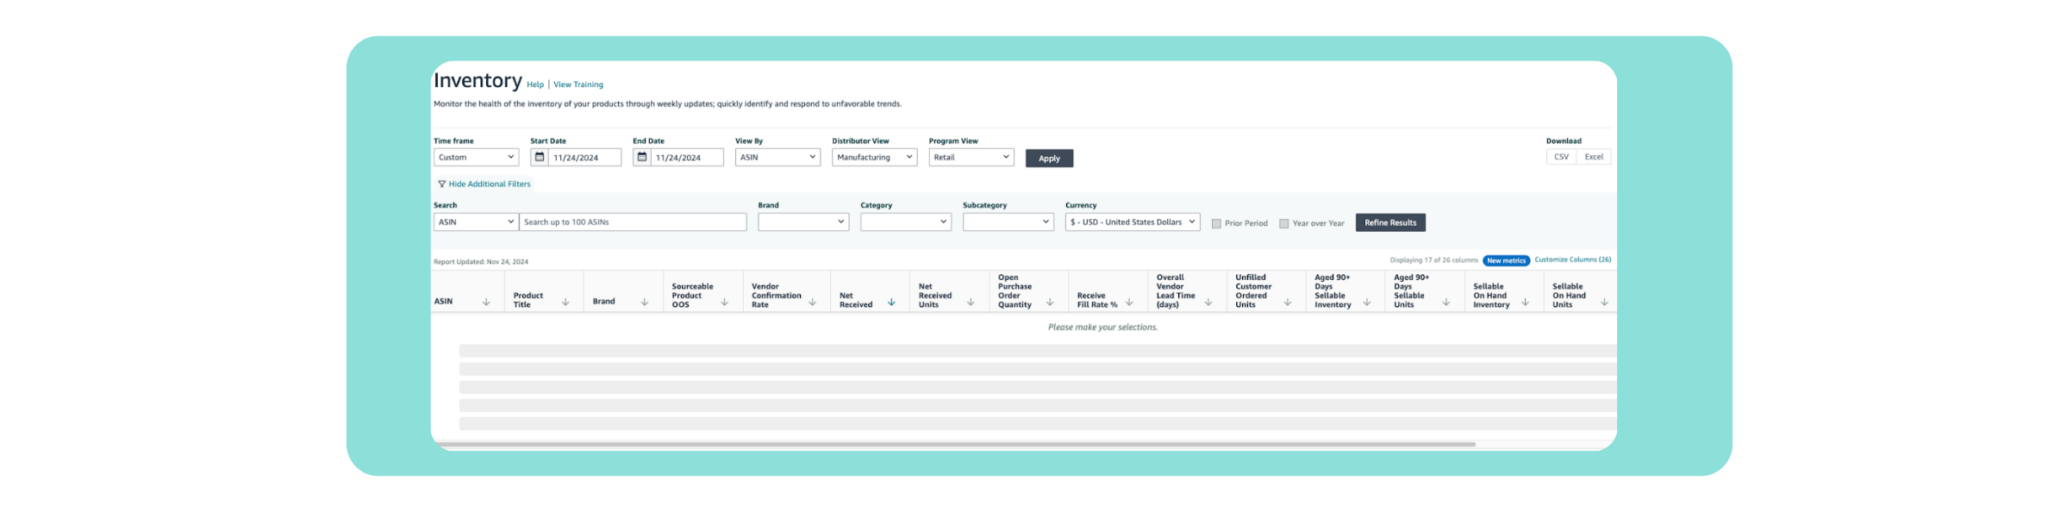
How do I manage inventory in Vendor Central?
You don’t have direct control over your inventory when selling through the Amazon Vendor Central program. While Amazon does a good job of forecasting and ordering appropriate amounts, it still behooves your brand to collaborate with Amazon when you see a discrepancy, especially if you will not be able to fulfil an order in time.
Make sure that you’re keeping track of incoming POs from Amazon and have adequate stock to fulfill those POs on time. Amazon offers useful forecasting tools to help you anticipate upcoming order quantities. Leveraging these will help you have enough quantity manufactured and in position in anticipation of POs.
Where can I see demand forecasts in Vendor Central??
You can click into the Forecasting dashboard in Amazon Vendor Central to identify customer demand of your products. Amazon provides both sales and inventory forecasts to help you anticipate demand. When you leverage these forecasts in combination with your external tools and systems, you can most accurately plan for production and distribution.
Seeing all of your forecasting data in one place can help you improve your inventory allocation and ensure there isn’t waste throughout your supply chain. Tools like Alloy.ai aggregate all of your e-commerce forecasts under a single roof so you can look across channels for better planning. Track demand signals against plan within a single view.
How do I set permissions for different Vendor Central users?
The primary account holder of your Vendor Central account is in charge of assigning specific roles and permissions to additional users within your company. This provides a layer of security and ensures only the right people have access to the actions relevant for their function. The primary account holder has access to all areas within Vendor Central.
Follow these steps to add a user in Vendor Central:
- Navigate to ‘Settings’ and select ‘User Permissions.’
- Click “Add a new user” and enter the individual’s name and email address.
- Choose the “Invite” option to send an email invitation to the new user inviting them to join the account.
- Once the user accepts the invitation you can further edit their permissions.
Non-admin users typically fall into these pre-specified user roles.
- Administrator: Manages the business account and has permission to oversee payment methods and shipping addresses.
- Buyer: Authorized to place orders.
- Finance User: A reporting function that can access, customize, and schedule business reports.
- Tech User: Handles domain names, API keys, authentication methods, and IT system integrations like purchasing systems and single sign-on (SSO).
To further customize these jobe roles to the individual user, you can click on ‘Manage Permissions’ next to the user’s name. Here you can assign permission levels by specific section. For example, you can choose ‘View’ or ‘Edit’ permission for screens such as Inventory, Orders, Advertising, or Reports.
What marketing tools are available through Amazon Vendor Central?
Marketing and advertising on Amazon Vendor Central can help you get your products in front of more consumers, with better visuals and better prices, to drive sales. Shoppers are more likely to buy your products if they show up higher in search results and portray good value or a discount. If your product looks “established,” meaning high-quality content is available for viewing, shoppers are also more likely to trust your listing. There are multiple marketing and advertising tools you can use within Vendor Central. Here’s a quick breakdown of the most popular ones.
- Amazon Advertising Console: This is a self-service platform that lets vendors create targeted campaigns for their products. Here, they can set up Sponsored Products and Sponsored Brands with specific customer segments selected. This gets the right products and brands in front of the audiences most likely to buy.
- A+ Content: This is a content enhancement tool that is only available to vendors in the Amazon Vendor Central program. It’s designed to help vendors make high-quality product listing pages through better visuals, formatted descriptions, and pre-designed templates. It helps make each product listing professional-grade to stand out from regular listings from non-vendor sellers, building trust and helping customers make better-informed decisions.
- Amazon Vine: Like becoming a vendor, Amazon Vine is an invite-only program. It is made up of a group of trusted product reviewers that leave honest and unbiased testimonials on new and upcoming products. These reviewers are known as Vine Voices and receive free products in exchange for their reviews. Consumers can use these reviews to inform their purchases.
- Coupons and Promotions: You can easily create coupon offers and promotions through your Vendor Central account. There are various promotional types, including:
- Single-use coupons distributed to specific customers
- Percent-off or Fixed dollar-off coupons
- ‘Lightning’ and ‘Best’ deals
- Temporary price reductions
- BOGO offers
- Subscribe & Save
- Bundling offers
- Free Shipping for non-Prime members
- Brand Stores: You can build a dedicated brand storefront on Amazon to showcase your products and reinforce your brand identity. This storefront is highly polished, including high-quality imagery, and highlights your brand identity and its benefits clearly for shoppers.
How do trade terms impact my ability to run promotions in Vendor Central?
Brands all agree to certain trade terms from the outset of becoming a vendor in the Amazon Vendor Central program. These trade terms outline the financial agreements you as the brand or manufacturer have agreed to with Amazon. These influence your ability to run promotions and are different for each brand.
Here are a few ways your trade terms might impact your ability to run promotions:
- Cost-Sharing for Promotions – You may have already agreed to fund a percentage of promotions as part of you trade terms. This may limit your ability to support future or deeper discounts.
- Discount Funding – Your trade terms may specify how promotional discounts are funded. Discounts may be entirely funded by your company or may be shared with Amazon.
- Promotional Allowances – You may have a “promotional allowance” agreement within your trade terms. This covers a portion of promotional activities and may result in more opportunities to run campaigns without additional costs for vendors with bigger allowances.
- Reimbursement or Chargebacks – Amazon may choose to deduct promotional costs from your payments. Stay on top of how future charges may affect profitability even if they don’t hit your ledgers in the short term.
- Frequency and Duration – Your trade terms may stipulate how frequently you’re allowed to run promotions. There may even be a maximum duration cap already agreed to. Check these agreements before entering any promotional planning phases.
- Amazon Approval – Amazon may require that you seek their approval for certain promotional activities. Make sure that you have complied with the agreed upon terms before taking any final action.
How do I set up Amazon Vine for product reviews?
Most vendors in the Amazon Vendor Central program are eligible to participate in Amazon Vine. If you’re interested in earning product reviews from verified reviewers, you can start the process in your Vendor Central account.
Find the ‘Vine’ option from either the ‘Merchandising’ or ‘Advertising tabs. Choose the product which you’d like to enroll in the program and check that it meets eligibility requirements.
Amazon Vine Eligibility Requirements:
- Product Condition: New
- Review Count: <30 reviews
- Inventory: Enough inventory to supply Vine reviewers
- Fulfillment Method: Must be available via Fulfillment by Amazon (FBA).
- Product Listing Completeness: High-quality images, complete details and description
- Brand Registry: Your brand must be enrolled in the Amazon Brand Registry
- Product Category: Cannot fall within a restricted category (e.g., “Adult” products, digital software, and applications).
Next, submit a specific number of units to the Amazon Vine program. You will be charged an enrollment fee for each item you choose to include in the program. Then, Amazon will distribute your products to reviewers for unbiased testimonials and product reviews.
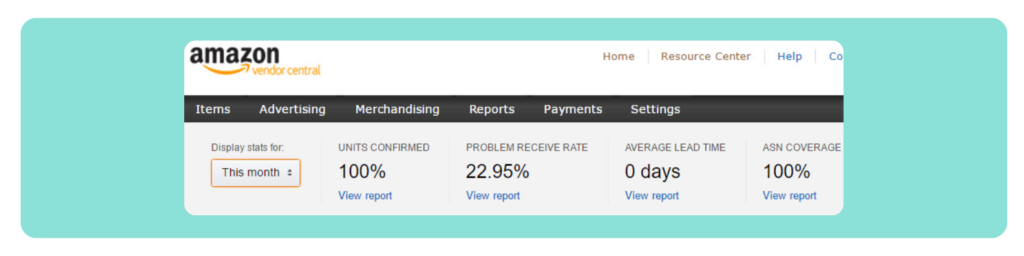
How does the reporting dashboard work in Vendor Central?
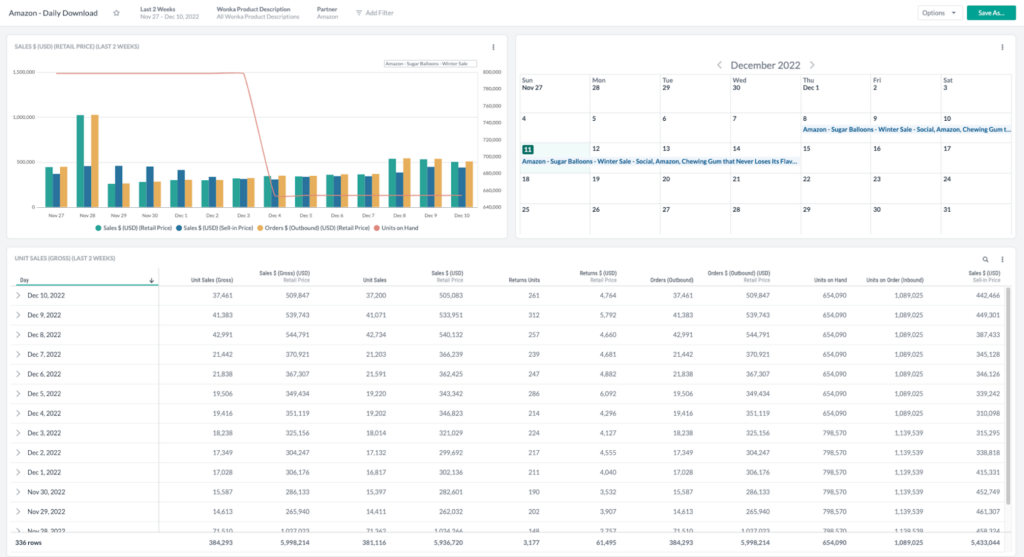
Amazon Vendor Central provides multiple dashboards as well as raw reports that cover metrics like sales, inventory, and forecast data. You typically need to pull these reposts individually by market, with separate reports for each country. You can pull reports at different time granularities (daily, monthly, etc) and for specific metrics like inventory levels and unit sales.
What insights can you get from the Retail Analytics dashboard?
The Amazon Retail Analytics (ARA) dashboard in Vendor Central gives you a comprehensive suite of reports for analyzing all your Amazon-specific data. These are some of the reports that come pre-configured within the platform:
- Sales Report
- Real-Time Sales Report
- Inventory Report
- Traffic Report (product detail page impressions)
- Forecasting Report
- Net PPM (Pure Product Margin)
- Catalog Report
These reports give you a detailed look into both your tangible inventory and sales metrics as well as your marketing and page listing performance. By regularly analyzing these dashboards you can gain an understanding of your Amazon performance and find opportunities to improve.
What KPIs should consumer goods companies monitor in Vendor Central?
Monitor these KPIs to stay on top of your Amazon Vendor Central performance:
- Ordered Revenue by Units
- Shipped Revenue by Units
- Customer Returns
- Conversion Rates
- Sellable On-Hand Inventory
- Unsellable Inventory
- Out-of-Stock Rate
- Days of Supply
- Sell-Through Rate
- Lead Time Accuracy
- Chargebacks
- Detail Page Views (Glance Views)
- Add-to-Cart Rates
- Net Pure Product Margin (PPM)
- Promotional ROI
- Forecast Accuracy
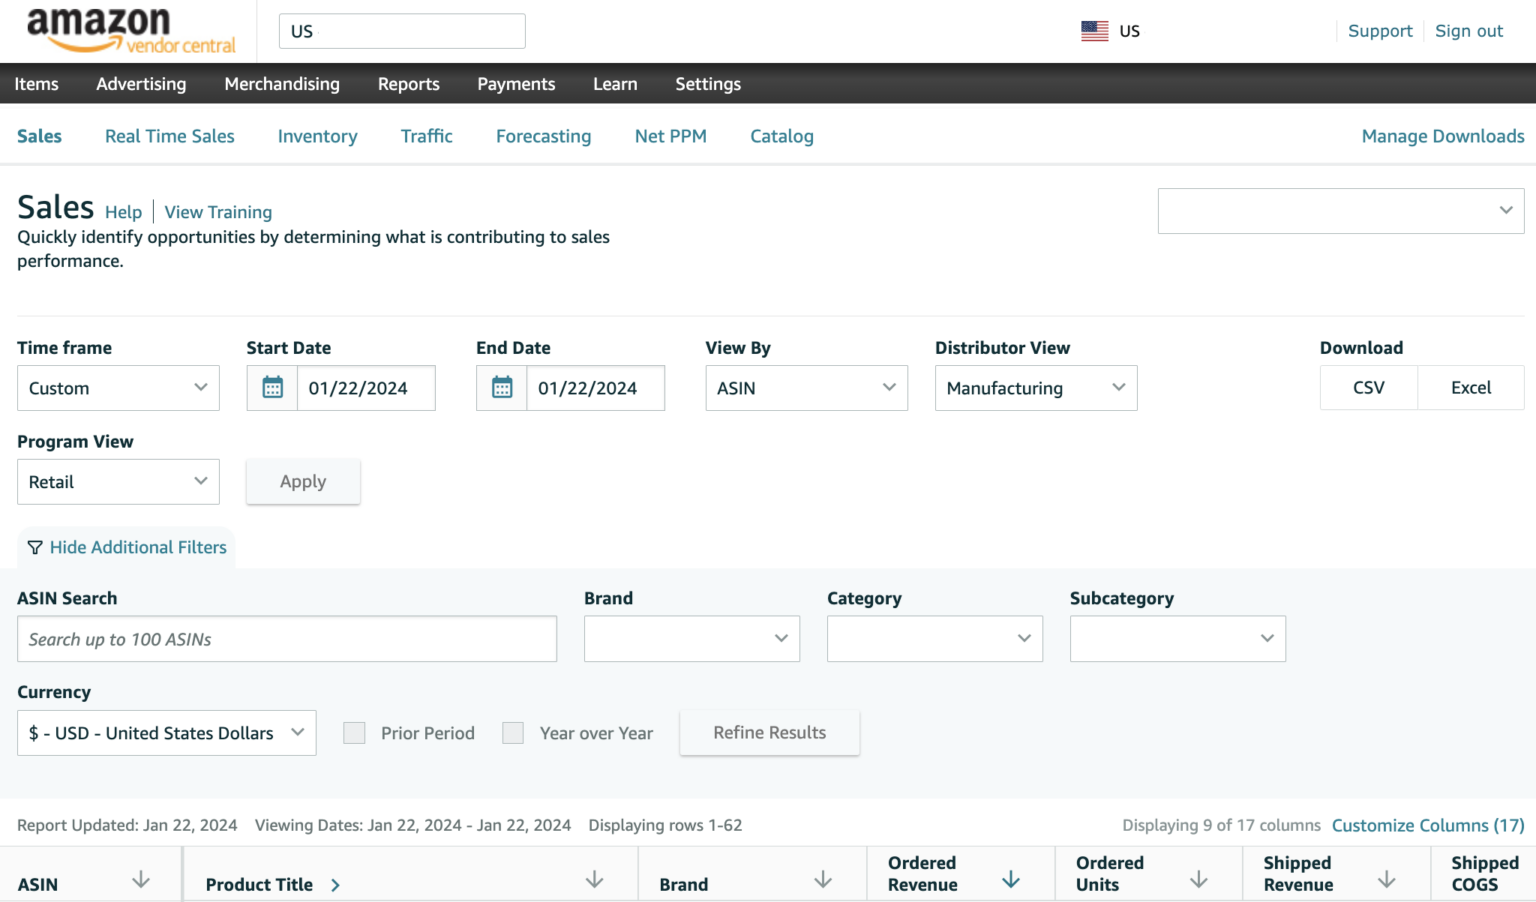
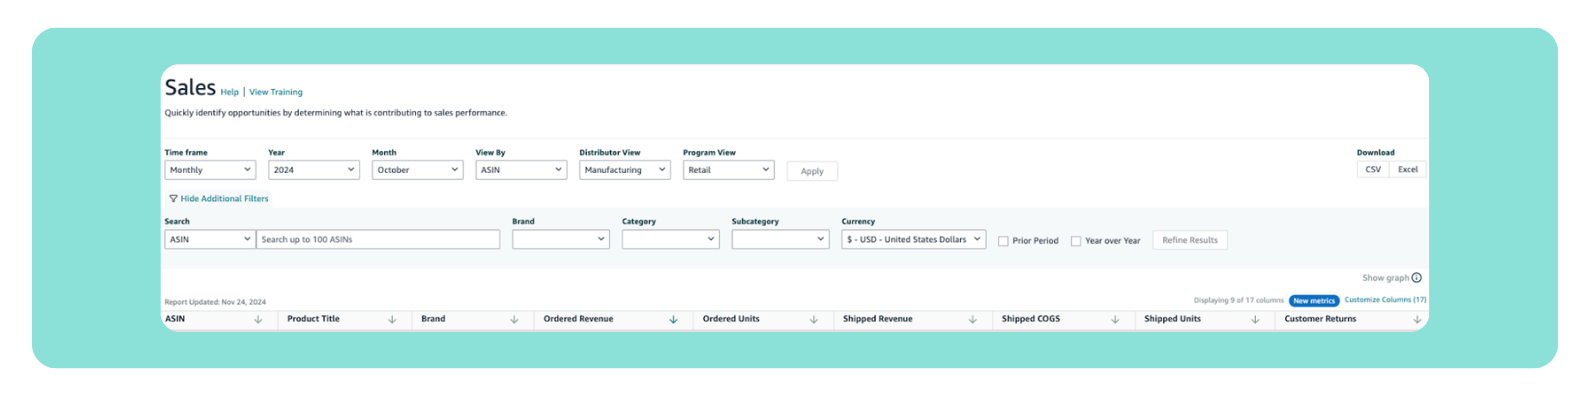
How do I generate sales reports in Amazon Vendor Central?
- Go to ‘Reports’ or ‘Analytics’
- Click on Amazon Retail Analytics (ARA)
- Select ‘Sales Diagnostics’ or ‘Sales Performance’
- Choose the sales metric you want to measure:
- Shipped Revenue
- Ordered Revenue
- Unit Sales
- Use filters to tailor the report by:
- Time Range
- Product Categories
- Geographic Region
- Download your report
How do I check my inventory in Amazon Vendor Central?
- Go to ‘Reports’ or ‘Analytics’
- Click on Amazon Retail Analytics (ARA)
- Choose the type of inventory you want to measure:
- Sellable Inventory
- Unhealthy Inventory
- Out-of-Stock Inventory
- Use filters to tailor the report by:
- Time Period
- Products
- Regions
- Download your report
What are common challenges of Amazon’s reporting dashboard?
- Inconsistent metric labeling – One of the biggest challenges brands face when attempting to understand Amazon’s metrics is a lack of uniformity. Metrics do not always mean the same thing across products or categories. For instance, metrics like “unit sales gross” may take into account different time horizons or different currencies depending on the product.
- Data availability issues – During peak periods there are often data delays and incomplete reports are common. There is not easy way to understand if data is missing or incomplete when performing analysis within Amazon Vendor Central. This can result in reworks or poor understanding of ongoing trends.
- Restatements of historical data – Amazon is known to retroactively update historical data without notifying the vendor. This can lead to discrepancies in reporting.
- Analyst commitment – To understand the data Amazon provides to its fullest, analyst time needs to be dedicated. It can take hours of work each week to synthesize findings down into an understandable format.
What are best practices for using Amazon Vendor Central?
As a brand selling directly to Amazon, there are a few main things you should be doing to maximize your relationship with this retailer.
- Optimize your product listings – Make sure your product titles, descriptions, and images are professional quality and appealing to your audience.
- Maintain optimal inventory levels – Missing a PO from Amazon will damage your relationship. Keep an eye on demand forecasts and communicate ahead of time if you won’t be able to fulfil demand.
- Take advantage of advertising capabilities – Vendors get special advertising options that third-party sellers on Amazon don’t. Try out coupons, promotions, and Lightning Deals to see what drives sales!
- Analyze performance metrics – Keep tabs on your top KPIs like Revenue, Out-of-Stock Rates, On-Hand Inventory, and Forecast Accuracy to make sure you’re winning the most sales and keeping Amazon happy.
- Stay collaborative with Amazon – Amazon will likely be your largest customers if you manage your relationship right. Respond quickly to concerns, comply with your trade agreements, and ask for help when something doesn’t seem right.
How can consumer goods companies take their Amazon Vendor Central reports to the next level?
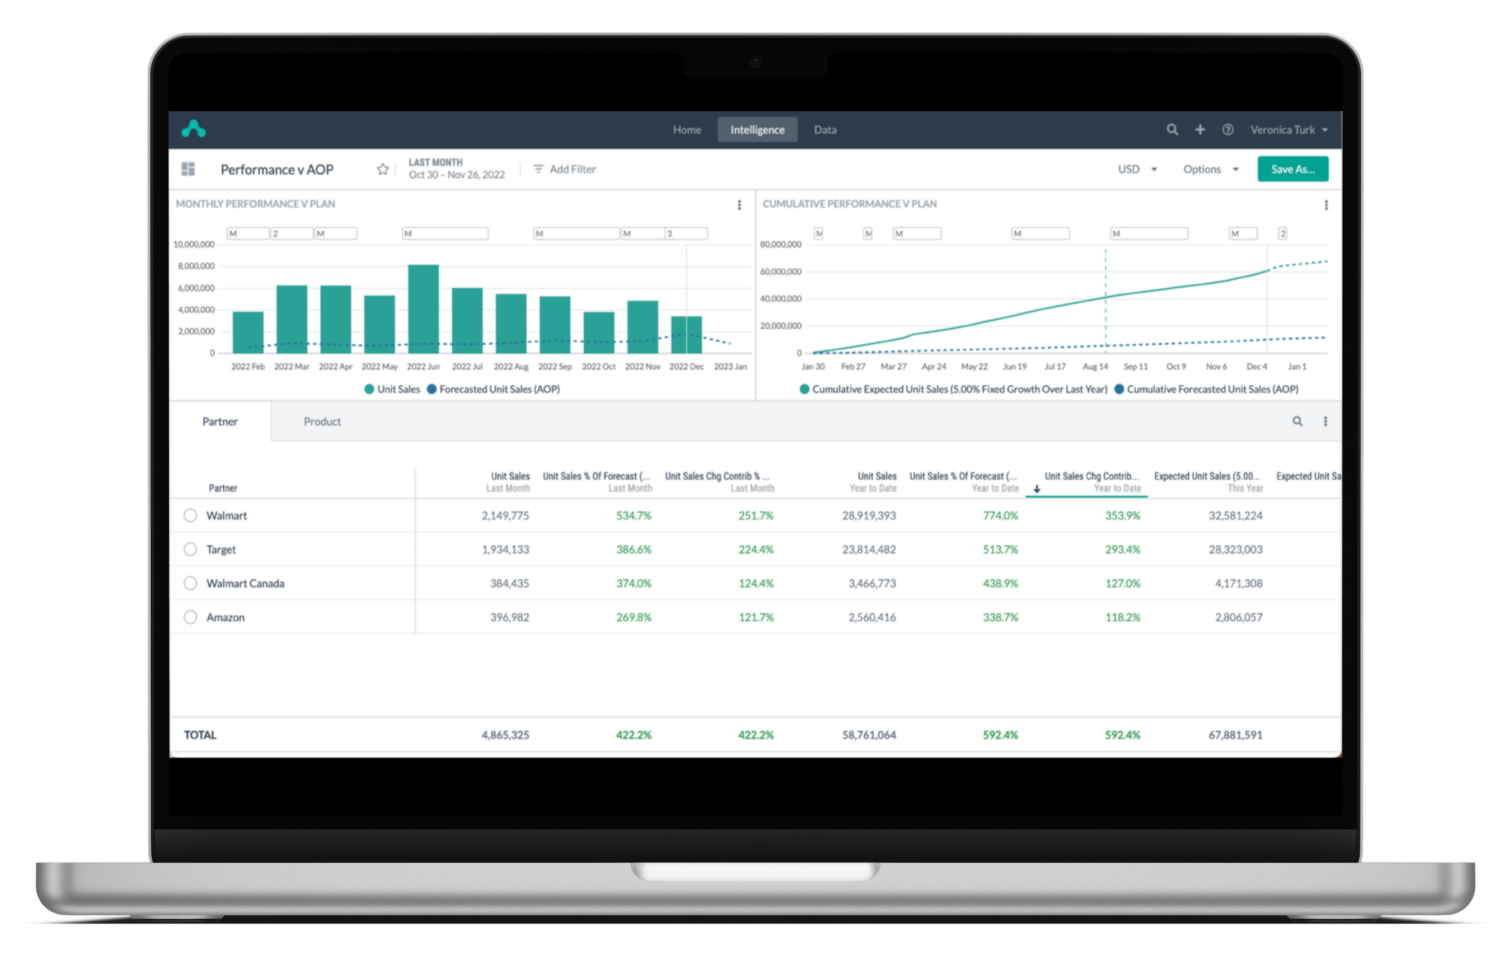
One of the best ways to optimize your performance on Vendor Central is to get the best understanding of your metrics and turn those insights into action. To do so, brands can leverage technology that helps them automate data collection, streamline reporting, and adapt to constant platform changes.
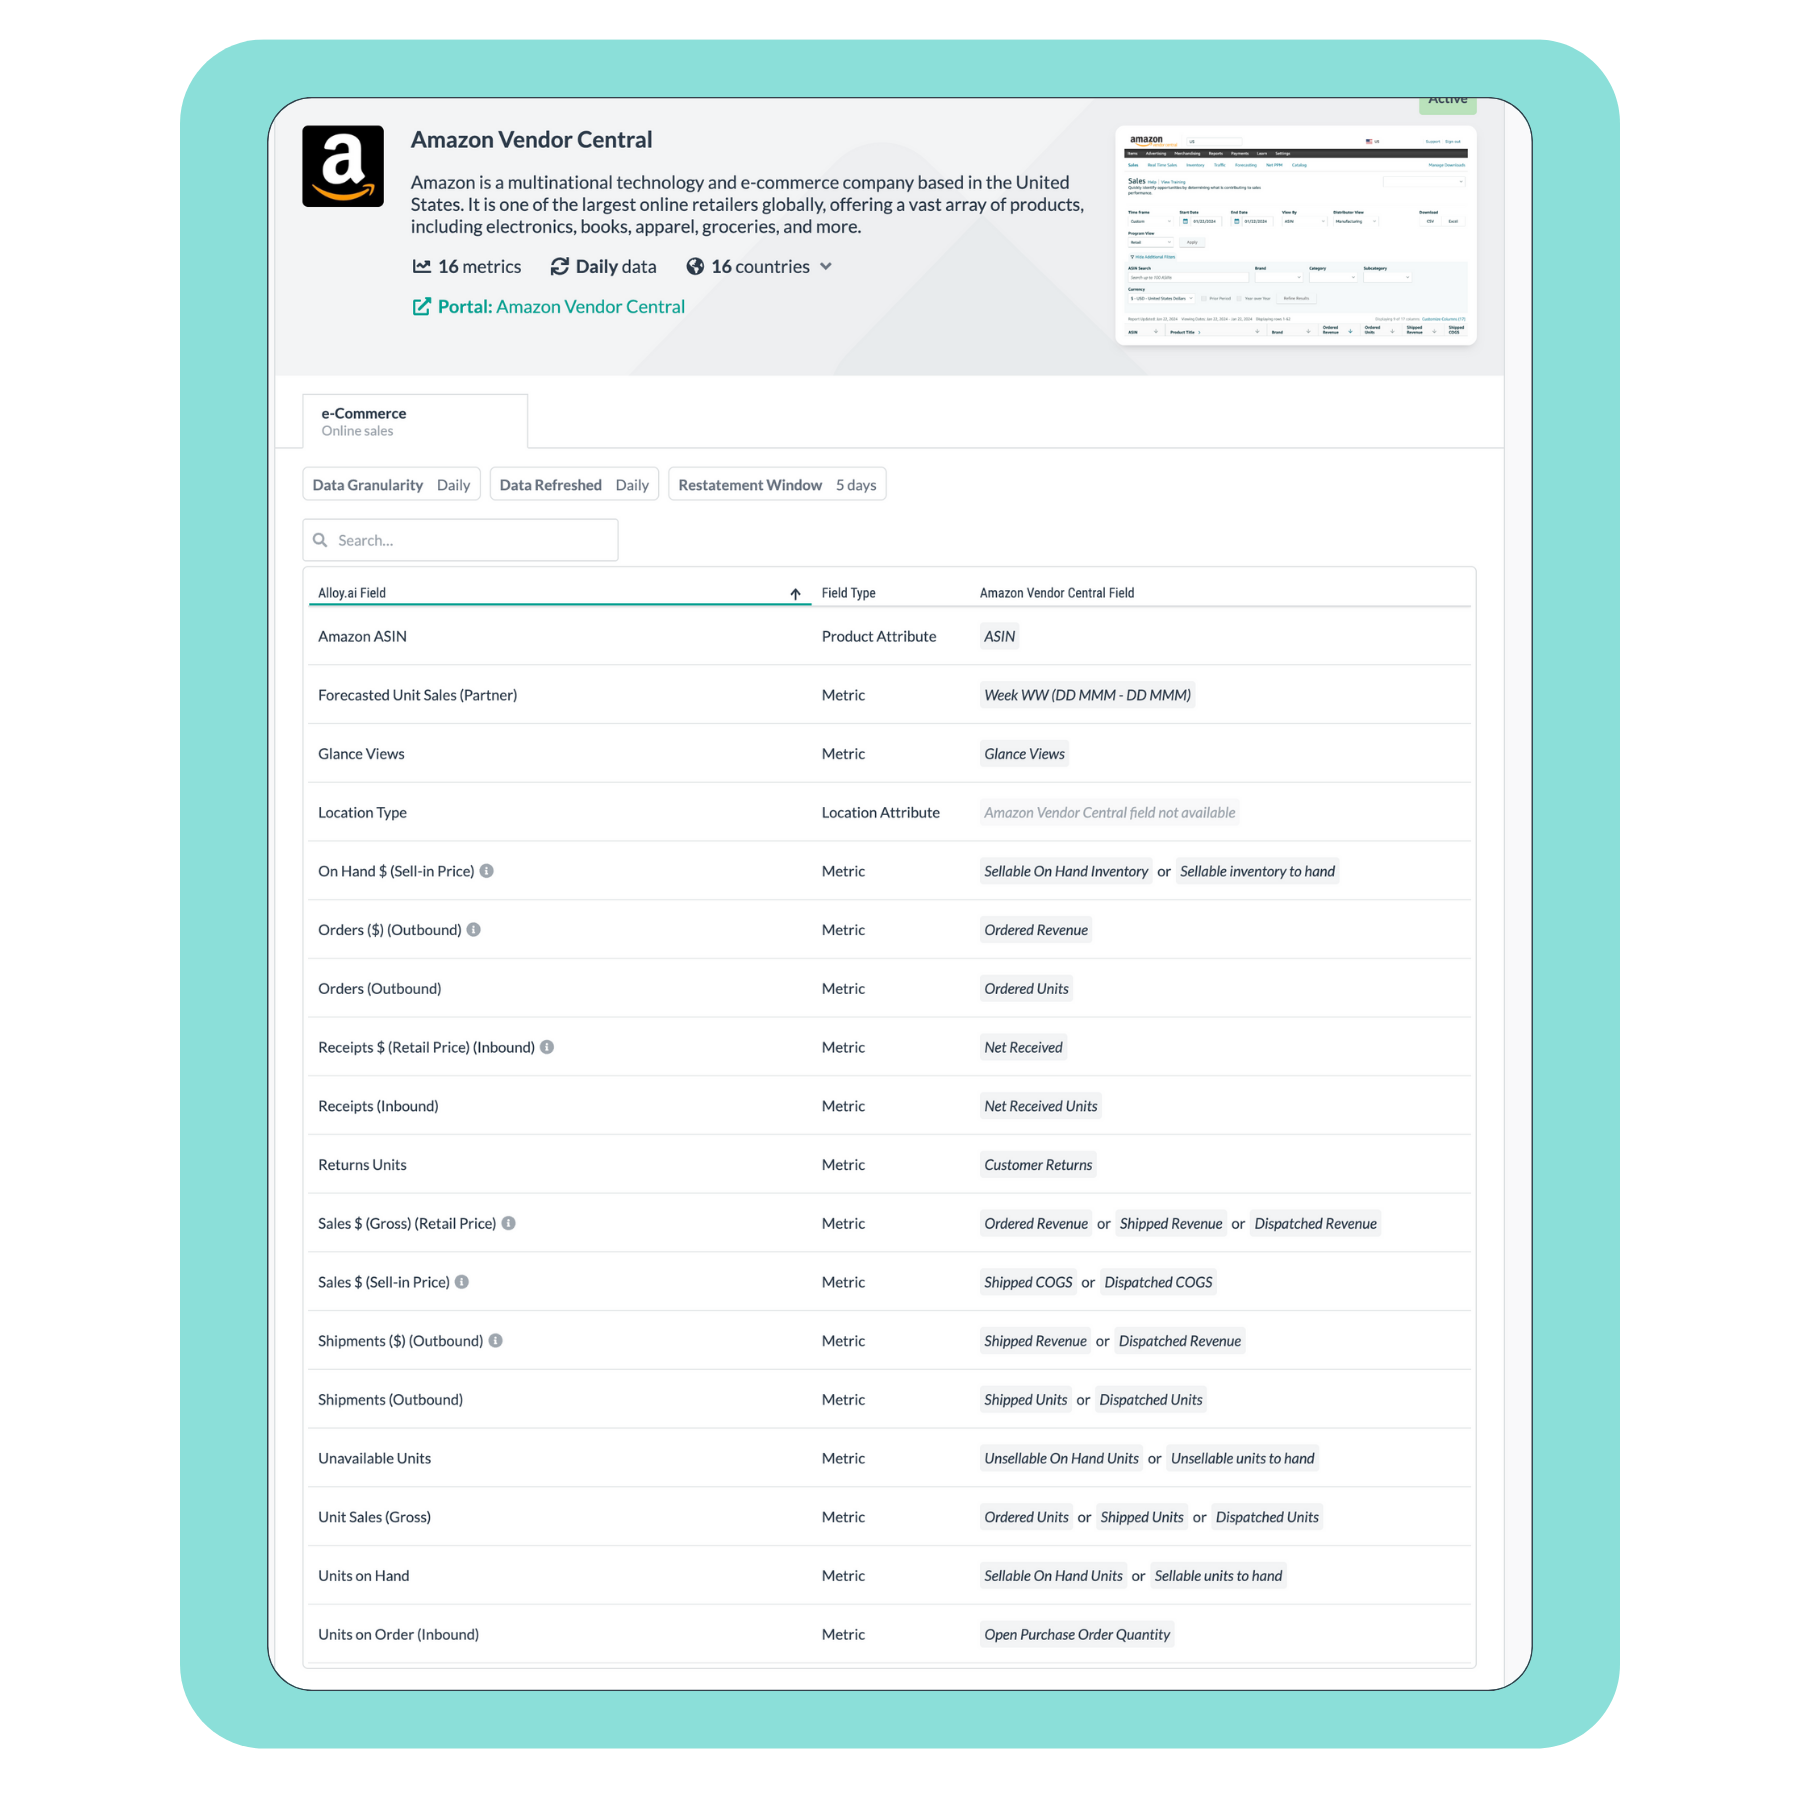
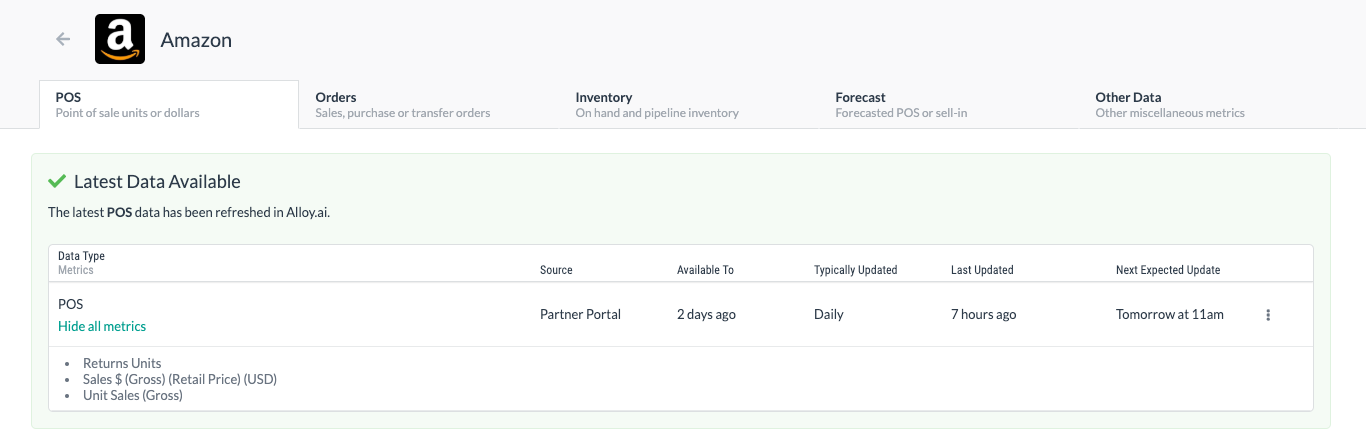
Alloy.ai simplifies the tedious process of pulling daily data across countries and regions and consolidates those insights into a single platform. It helps teams maintain accurate reports, even as Amazon continually updates report formats and metrics. That, coupled with the platform’s ability to normalize currency, provide clear metric definitions, and enable cross-channel comparisons helps consumer goods brands make data-driven decisions. And because you can integrate your other e-commerce channels, you can get a single snapshot of your entire online presence in one location to understand your sales.
Try optimizing your complex Amazon Vendor Central reporting with Alloy.ai today!
See how Alloy.ai simplifies cross-retailer reporting

Franklin Morris
Franklin Morris is Vice President and Head of Global Marketing at Alloy.ai. He's spent his career leading brand, content and demand generation marketing for high-growth startups, ad agencies, and Fortune 50 giants, including IBM, Dell, Oracle, Rackspace, 3M, Facebook, Electronic Arts, Informatica, Sisense, and Argo Group.